顯示具有 電腦教學 標籤的文章。 顯示所有文章

1/28/2015

CentOS serving home directory with Apache

CentOS serving home directory with Apache


<IfModule mod_userdir.c>
First, edit /etc/httpd/conf/httpd.conf, and find the section that begins:If you want to setup CentOS to allow Apache to serve out the user home directories there's a couple of quick settings that need to be changed.
Comment out UserDir disabled, and uncomment the line saying UserDir public_html.
Then, restart httpd, and change one of the SeLinux booleans:
service httpd restart
setsebool httpd_read_user_content on
The final thing to make sure of is that the /home/username folder is world executable, and make the public_html folder:
chmod a+x ~/
mkdir ~/public_html
echo "Hello World" > ~/public_html/index.html
The user directory needs to be 711 and the public_html folder 755.

9/19/2014

How to stop Windows 8 Evaluation from automatic shutdown... 停止 Window 8 Evaluation 過期每小時重啟問題...

If you are using Windows 8 Enterprise evaluation RTM as your primary OS, then you have made a big mistake. You probably should have installed it in an virtual environment .The evaluation period lasts for 90 days and after the trial period expires, it cannot be renewed even you have purchased genuine license, nor can it be downgraded or upgraded to another edition. So, what happens when the 90 day trial period expires? The answer is--automatic shutdown that gets triggered every hour. There are no warnings before shutdown and you will lose all of your work. Microsoft was very clear about this from the beginning and they have used similar tactics on previous version of Windows too.

Now, you have got no choice to install another version of windows. This can be a pain when you have no access to physical installation media and you may have problems getting other version of Windows from the internet. However, there is a solution to this. The automatic shutdown is the doing of a process/service that runs in the background and starts a timer that runs down when you have logged into your machine. This service is called "Windows Licence Monitoring Service". Well, you can guess what it does. It basically monitors the licence state of the machine and if it has expired, it triggers an automatic shutdown.  If you try to end this process through task manager then you will probably get blue screen of death (BSOD).

So, our solution to this problem is to remove the "Windows Licence Monitoring Service".
This tutorial is in no way meant to promote piracy but enable people who are stuck with running Windows 8 for an hour, to get and install another version of the Windows. So, here is how you do it.........
  • First download Windows PsTools. This tool is provided by Microsoft for maintaining processes and services through command line.
          Download
  • This tool is provided in zipped format and you need to extract it somewhere. 
  • Create folder called - PS on C: drive
  • We will extract all the contents of the zip file in C:\ drive into the folder PS (which we just created)
  • After that you need to start command prompt with Administrator privileges. To do this--
        ---Open- task manager.
        ---Go to- File
        ---Create- New Task
        ---Check the "Create this task with administrator privileges" checkbox.
        ---Type- cmd
        ---Press- Enter
  • You will see the command prompt.
  • Type- c: 
  • Type- cd /
  • Type- cd PS
  • Type- psexec -i -d -s cmd
  • Click- Agree on the license agreement dialog box
  • Then you will get another command prompt running under "nt authoriy\system"
  • To check if the command prompt is running under "nt authority\system"--
  • Type- whoami
    You should see 
    nt authority\system.
  • Type- sc delete WLMS
  • Type- regedit
  • The above command will open registry editor
  • Navigate to- HKEY_LOCAL_MACHINE->System->CurrentControlSet->Services
  • Locate- WLMS
  • Right click the Key and press delete.
  • Restart the computer
The simpler way of doing it would be to just open command prompt with administrator privileges and run the command  "sc delete WLMS" and then delete the WLMS key from the registry. However, if it doesn't work, you can try the above method.

8/08/2014

iOS Syncing with Google Contacts (Apple btw Andriod)

iOS: Syncing with Google Contacts


Learn how to set up syncing with Google Contacts on your iPhone, iPad, or iPod touch.


Follow these steps if you're using iOS 7 to sync your contacts with Google Contacts:
  1. Tap Settings > Mail, Contacts, Calendars > Add Account > Google.
  2. Enter the required information in the fields.
  3. Make sure Contacts is on.
After you have completed the setup, open the Contacts app on your device. Syncing should begin automatically.

Additional Information

If you're using iOS 5 or iOS 6, follow these steps to set up contact syncing with Google Contacts:
  1. Tap Settings > Mail, Contacts, Calendars > Add Account... > Other > Add CardDAV Account.
  2. Enter the following information in the fields:
    • Server: google.com
    • User Name: your full Google email address
    • Password: your Google account password
  3. Tap Next at the top of the screen to complete the setup.
After you have completed the setup, open the Contacts app on your device. Syncing should begin automatically.
Note: Make sure that SSL is enabled (under Advanced settings) and the port is 443.
You may also visit the Google website to learn more about syncing with Google contacts.

Important: Mention of third-party websites and products is for informational purposes only and constitutes neither an endorsement nor a recommendation. Apple assumes no responsibility with regard to the selection, performance or use of information or products found at third-party websites. Apple provides this only as a convenience to our users. Apple has not tested the information found on these sites and makes no representations regarding its accuracy or reliability. There are risks inherent in the use of any information or products found on the Internet, and Apple assumes no responsibility in this regard. Please understand that a third-party site is independent from Apple and that Apple has no control over the content on that website. Please contact the vendor for additional information.
Important: Information about products not manufactured by Apple is provided for information purposes only and does not constitute Apple’s recommendation or endorsement. Please contact the vendor for additional information.

*轉自APPLE 網站*

9/12/2013

RHEL / CentOS Linux: Mount and Access NTFS Partition

How to enable NTFS support on CentOS Linux version 5 or 6? How do I mount ntfs partition under RHEL 5 or 6?

First, you need to install EPEL repo as described here. The following command will turn in EPEL repo on RHEL / CentOS version 6.x:

$ cd /tmp
$ wget http://download.fedoraproject.org/pub/epel/6/x86_64/epel-release-6-8.noarch.rpm

# rpm -ivh epel-release-6-5.noarch.rpm

NTFS-3G

NTFS-3G is a stable, open source, GPL licensed, POSIX, read/write NTFS driver for Linux. It provides safe handling of the Windows XP, Windows Server 2003, Windows 2000, Windows Vista, Windows Server 2008 and Windows 7 NTFS file systems.
NTFS-3G can create, remove, rename, move files, directories, hard links, and streams; it can read and write normal and transparently compressed files, including streams and sparse files; it can handle special files like symbolic links, devices, and FIFOs, ACL, extended attributes; moreover it provides full file access right and ownership support.

How Do I Install NTFS-3G?

Type the following command as root user:
# yum install ntfs-3g

Sample outputs:
yum install ntfs-3g
Loaded plugins: product-id, rhnplugin, subscription-manager
Updating Red Hat repositories.
Setting up Install Process
Resolving Dependencies
--> Running transaction check
---> Package ntfs-3g.x86_64 2:2011.4.12-3.el6 will be installed
--> Finished Dependency Resolution
Dependencies Resolved
===============================================================================
 Package         Arch           Version                     Repository    Size
===============================================================================
Installing:
 ntfs-3g         x86_64         2:2011.4.12-3.el6           epel         247 k
Transaction Summary
===============================================================================
Install       1 Package(s)
Total download size: 247 k
Installed size: 624 k
Is this ok [y/N]:

How Do I Find Out NTFS Partition Name?

Simply type the following command:
# fdisk -l /dev/sda
# fdisk -l /dev/sdb

Sample outputs:
Disk /dev/sda: 500.1 GB, 500107862016 bytes
255 heads, 63 sectors/track, 60801 cylinders
Units = cylinders of 16065 * 512 = 8225280 bytes
Sector size (logical/physical): 512 bytes / 512 bytes
I/O size (minimum/optimal): 512 bytes / 512 bytes
Disk identifier: 0xf0000000
   Device Boot      Start         End      Blocks   Id  System
/dev/sda1   *           1          13      102400    7  HPFS/NTFS
Partition 1 does not end on cylinder boundary.
/dev/sda2              14       60802   488281089    5  Extended
/dev/sda5              14       59767   479970304   83  Linux
/dev/sda6           59767       60802     8309760   82  Linux swap / Solaris

How Do I Mount /dev/sda1 NTFS Partition at /mnt/ntfs?

First, load the fuse driver, enter:
# modprobe fuse
Create a mount point, enter:
# mkdir /mnt/ntfs
To mount the ntfs partition, enter:
# mount -t ntfs-3g /dev/sda1 /mnt/ntfs
You can use regular Unix commands to copy or access the files:
$ df -h
$ mount
$ cd /mnt/ntfs
$ cp foo /tmp

How Do I Unmount NTFS Partition?

Type the following command:
# umount /mnt/ntfs


*source from internet

7/25/2013

如何用FileZilla上傳檔案教學

照慣例先從下載開始說起

下載及開啟程的內容如下:

Step 1.
以Windows為例 首先到官網下載 FileZilla_3.7.1.1_win32-setup

請選「儲存」後,進行下載檔案,等下載完成檔案後,並且執行「FileZilla_3.2.3.1_win32-setup.exe」。


Step 2.
而使用者也可以透過快速連線列,並輸入FTP站台的基本資訊後,按下〔快速連線〕。 注意:本站不支援這種方式,為什麼?下列圖示有說明。

2.使用站台管理員並連線到FTP站台

Step 3.
在FileZilla中,使用者可以藉由站台管理員建立與管理FTP站台,並且可針對個別站台做站台編碼及連接埠的設定,是進入FileZilla最基礎的功能。
內容如下:
Step 1.
打開FileZilla,並按下功能表上的【檔案】→【站台管理員】,並按下〔新站台〕後,輸入伺服器的相關資訊。

Step 2.
若使用者需要在連線到特定站台時,自動切換到本地端或伺服器端之特定資料夾目錄,則請按下〔進階設定〕,並在〔預設本地目錄〕和〔預設遠端目錄〕輸入資料夾名稱。


由於大多數的FTP站台所使用的連接埠皆設為21,故使用者若未輸入指定的連接埠時,FileZilla是以「21」做為預設值來登入的動作。而使用者名稱若未輸入,則是以「anonymous」的帳號做匿名登入。
Step 3.
設定完成後,按下〔連線〕即可連線到設定的站台。在連線時,FileZilla會自動判別該站台的編碼,而若因判別錯誤使得檔案或資料夾名稱產生亂碼時,請再回到站台管理員中,並在〔字碼集〕設定該站台的編碼。以繁體中文站台為例,通常設為「Big5」即可解決。


Step 4.
使用者也可以透過工具列上的圖示旁的下拉式選單,而FileZilla會列出所有於站台管理員的站台,供使用者選擇並連線。


3.傳輸檔案與設定傳輸速度限制

在連接上了站台之後,最重要的是莫過於就是透過FileZilla來傳輸檔案。而在檔案的傳輸過程中,
若未設定傳輸速度,有可能會影響我們透過網路觀看串流影片、玩線上遊戲,甚至是瀏覽網站的流暢度。
故設定傳輸的速度限制,是很重要的一門招式。
Step 1.
打開FileZilla,並按下功能表上的【編輯】→【設定】,並找到左側面版的〔傳輸〕,
在「速度限制」處,先勾選「Enable Speed Limit」後,再輸入上傳及下載的速度限制。

FileZilla預設為不勾選「Enable Speed Limit」,代表無速度限制。
Step 2.
若伺服器端允許使用者下載檔案,則只要在「遠端站台」處的檔案或資料夾上,按下〔滑鼠右鍵〕→〔下載〕,就可以將整個目錄或檔案下載至本地端。

若選擇〔加入檔案至佇列中〕,則要傳輸的檔案或先置於佇列清單中,但不會立即傳輸。
Step 3.
若伺服器端允許使用者上傳檔案,則只要在「本地站台」處的檔案,按下〔滑鼠右鍵〕→〔上傳〕,就可以將本地端的目錄或檔案上傳至伺服器端。

Step 4.
若無法上傳或下載檔案,可以在檔案或資料夾上按〔滑鼠右鍵〕→〔檔案屬性〕,檢查是否擁有相關的權限。而使用者為擁有者,則可以變更相關的權限。

4.檔案的操作示範

FileZilla除了上傳及下載檔案的功能外,對於有權限的使用者而言,他另外提供數個簡易的功能,供使用者處理遠端檔案,如刪除檔案、重新命名檔案等。
Step 1.
打開FileZilla,並在「遠端站台」處,以刪除檔案為例,只要按下〔滑鼠右鍵〕,並選擇〔刪除〕即可。


若無法刪除資料夾,且使用者對於該資料夾有足夠的權限,則可以按下功能表上的【伺服器】→【強制顯示隱藏檔案】,以檢視是否因為尚存在隱藏檔案而無法刪除整個資料夾。
Step 2.
若選擇〔檢視/編輯〕,則FileZilla會將檔案下載至暫存資料夾中,讓使用者可以檢視或編輯檔案。而在編輯完成後,則是會詢問使用者是否上傳回原本的伺服器。

Step 3
而對於特定的副檔名,如word文件,可以選擇功能表上的【編輯】→【設定】,並選擇〔檔案編輯〕,在「檔案型態關聯」→「自訂檔案型態關聯」中,輸入相關的副檔名、程式位置及參數,以讓伺服器的檔案可以使用FileZilla的右鍵檢視或編輯。

Step 4.
若選擇上傳回伺服器中,因為伺服器已經擁有相同的檔案名稱,故會詢問處理的方式。

Step 5.
若要搬移檔案回上層的目錄中,只要選擇要搬移的檔案,並以拖曳的方式,將檔案拖曳進入上層資料夾的符號即可。

5.處理佇列中的檔案

若是一次要下載伺服器上的多個檔案,則FileZilla會先將未下載完成的檔案列入佇列中,再依序下載。而對於手動加入佇列的檔案,也可以透過調整優先權,來決定那一個佇列檔案必須先下載。
Step 1.
打開FileZilla,若佇列中的全部檔案尚未進行傳輸的動作,則可以在佇列中,按下〔滑鼠右鍵〕→〔處理佇列〕,以開始傳輸檔案。但若佇列的檔案項目已進行傳輸,則會停止傳輸。

Step 2.
FileZilla預設一次只能同時傳輸兩個於佇列中的檔案,若要調整其設定值,只要按下功能表上的【編輯】→【設定】,並找到左側面版的〔傳輸〕,並在「並行傳輸」→「最大同時傳輸數目」處,設定最大可容忍之同時檔案傳輸數量。而「並行下載限制」和「並行上傳限制」則是代表在佇列中之檔案同時進行下載和上傳的數量限制,但其值之設定不應大於「最大同時傳輸數目」之值。

Step 3.
使用者可以在佇列中,對個別檔案進行設定優先權的動作,優先權愈高的檔案,會愈早進行傳輸。

Step 4.
使用者亦可以在個別檔案上,按下〔預設檔案存在動作〕,設定若本地端或是伺服器端有同樣的檔案名稱時,FileZilla的處理動作。

Step 5.
若佇列檔案是在半夜下載時,為了節省電費,通常會希望下載完成後,能夠自動關機,這時只要在佇列處,按下〔滑鼠右鍵〕,並選擇對應的處理動作即可。

6.使用檔名篩選器

一般使用者的資料夾中,大多會混雜多個不同的副檔名,而若透過檔名篩選器,則是可以快速地尋找特定副檔名的檔案,並加快處理的速度。
Step 1.
打開FileZilla,按下功能表上的【檢視】→【檔名篩選器】,並勾選要啟用的篩選項目後,按下〔確認〕即可。

Step 2.
使用者亦可針對個別的篩選器做編輯,只要按下〔編輯篩選器〕後,再選擇要編輯的篩選器,並按下〔新增更多項目〕,即可新增要篩選的項目。

Step 3.
而若本地端和遠端擁相同的篩選器,則可以按下功能列上的圖示,進行目錄比對,而若是本地端與遠端都擁有的檔案,則會以白色背景顯示;反之則是以黃色背景顯示。

7.使用Proxy上FTP

若您覺得連連國外站台,常會有速度不夠快,這時透過Proxy連上站台,或許可以稍加加速。
Step 1.
打開FileZilla,並按下功能表上的【編輯】→【設定】,並選擇左側面版的〔連線〕→〔通用Proxy〕,並設定Proxy的相關資訊。

Step 2.
而在站台管理員中之站台要略過Proxy的設定,則在〔進階設定〕中,勾選「略過Proxy」。

8.匯入與匯出設定項目

雖然FileZilla提供免安裝版本,但其設定及站台項目等,仍是存放在系統槽中,所以當系統需要重新安裝,或是使用者需要將設定檔案轉移至其它電腦上時,就必須先將軟體的設定及站台等項目匯出。而這時候,FileZilla的匯出和匯入功能將是最好的幫手。
Step 1.
若要匯出設定的檔案,只要打開FileZilla,並按下功能表上的【檔案】→【匯出】,並選擇要匯出的項目及存檔的位置即可。

Step 2.
而要匯入檔案,則只要按下功能表上的【檔案】→【匯入】,並選擇要匯入的檔案及要匯入的項目即可。

除了設定檔案之外,FileZilla並不會覆蓋站台管理員以及已存在的佇列項目。以站台管理員為例,若已有原本的項目,則FileZilla在匯入時,若發現相同名稱的站台時,會將匯入站台,加上編號以示區隔。

9.清除個人隱私檔案

若使用者是於網咖或是公共電腦使用此軟體,別忘了在離開時清除個人的隱私檔案,以免遭到有心人士竊取及利用。
Step 1.
打開FileZilla,並按下功能表上的【編輯】→【清除私人資料】,並選擇要清除的項目後,按下〔確認〕即可。

10.維持連線不中斷

若連線到FTP站台且閒置過久時,常發現連線的session因為連線逾時,而讓使用者不經意地被伺服器中斷連線,導致使用者必須再度連上FTP,才能進行檔案的傳輸或查看。而對部份的FTP伺服器,可透過FileZilla代送「NOOP」的指令,讓使用者維持連線。
Step 1.
打開FileZilla,並按下功能表上的【編輯】→【設定】,並找到左側面版的〔連線〕→〔FTP〕,在「FTP 維持連線」處,勾選「送出FTP連線指令」後,按下〔確認〕即可。


對於部份FTP伺服器軟體,如FileZilla Server,因為有採用「No-transfer-time」的設計方法,即在某段固定的時間內,若使用者沒有進行檔案的傳輸,或是資料夾的查看與切換,伺服器將會主動中斷連線,故此方法並無法在每個FTP伺服器上通用。

11.不負責總結

FileZilla不但具備中文介面,除此之外,它還支援UTF-8,更是許多FTP軟體難以望其項背的。但其尚未支援站台與站台之間檔案的傳輸,以及缺乏分頁、依特定時段限制速度等功能,算是比較美中不足之地方。
若您是還沒有使用過此套軟體的使用者,本站建議可以下載此套軟體試用。除此之外,因為它是免費且開放原始碼的軟體,且壓縮版本放在隨身儲存裝置中就可以使用了,故從此之後就不用再汲汲營營地前往各大論壇找同類型商業軟體的破解版本,也不用擔心會發生在未具備足夠權限的電腦上無法安裝FTP客戶端軟體並使用的窘境!
然而,本站在此必須再度提醒,由於FileZilla是將站台、連線歷史、設定等項目存放於系統槽中,所以在離開公用電腦的時候,仍得先清除個人的隱私資料喔!

< 轉自網絡>

6/19/2013

免費申請 StartSSL™ 個人數位簽章與網站 SSL 憑證完全攻略

1. 先進入 StartSSL™ 官網: http://www.startssl.com ,並點選右上角的「登入」圖示


2. 輸入個人基本資料以申請個人憑證,方便日後登入該網站用。記得要輸入正確,尤其是 Email 地址


按下 Continue 登入時會提示你是否誠實的輸入正確的個人資料,確認後按下「確定」繼續


3. 接著去 Email 信箱收信,你會得到一個 驗證碼 (authentication code)


4. 回到瀏覽器,在網頁上輸入郵件中的驗證碼,並按下 Continue 繼續


他會說正在驗證你的個人資料,約要等 6 個小時內完成審查 ( 其實不用這麼久 )


5. 大約等個 5 ~ 10 分鐘就會收到一審核通過的 Email 郵件,並再次取得 驗證碼 (verification code)


6. 回到瀏覽器,在網頁上輸入郵件中的驗證碼,並按下 Continue 繼續


7. 這時要產生你的個人私鑰,必須選擇加密等級,保留預設選項即可,並按下 Continue 繼續


8. 大約幾秒鐘就會產生完成,直接按下 Install 按鈕,憑證就會自動安裝到你的作業系統裡!


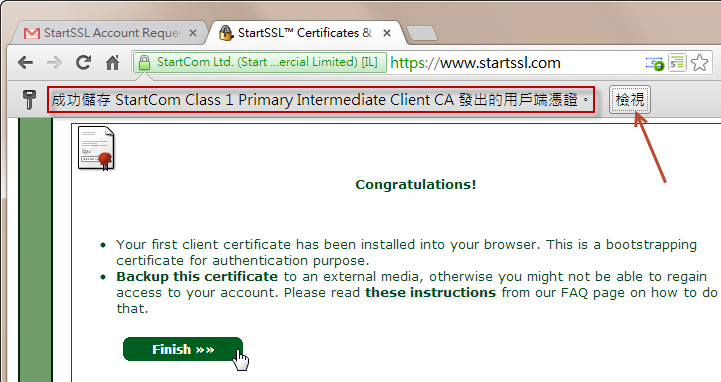
9. 若用 Google Chrome 瀏覽,會看到工具列下方會出現「成功儲存 StartCom Class 1 Primary Intermediate Client CA 發出的用戶端憑證。」的字樣,你可以點選「檢視」按鈕查看憑證資訊。


該憑證已經成功安裝到作業系統中,今後登入 StartSSL™ 網站不需要再次輸入帳號、密碼,從憑證資訊中也可以看出,該憑證的使用目的只有「向遠端電腦證明您的身份」以及「保護電子郵件訊息」這兩點而已,不能用來當作網站伺服器的 SSL 憑證用途:


10. 你也可以透過以下步驟查詢作業系統中的憑證清單


11. 會員註冊成功後,會進入該網站主要頁面,你必須依照三個步驟完成免費憑證申請的動作: (1) 驗證網域擁有權  (2) 申請憑證  (3) 其他憑證相關工具使用,而這三個步驟也相對應的提供三個頁籤可供操作。我們要先從 Validations Wizard 做起:


12. 這裡我們先執行「網站域名驗證」,確認你是特定「域名」的擁有人,確認之後,你才能申請免費憑證!


13. 輸入網域名稱


14. 下一步,你只能從以下 4 個信箱中選擇一個,如果沒有這些信箱的話,請建立一個可以收到信的信箱,如此一來才能驗證網站域名的擁有權!(收的到信,就代表你是網域管理者


15. 去收信,信件中會有一個 驗證碼 (verification code)


16. 回到瀏覽器,在網頁上輸入郵件中的驗證碼,並按下 Continue 繼續


17. 按下 Finish 即可完成驗證工作,接下來 30 天內,你可以建立任意數量的子網域憑證!而且免費


18. 完成後,從畫面右下角可以看出已經通過驗證的那些域名 (Domain Names)


19. 接著,透過 Certificates Wizard 產生 Web Server SSL/TLS Certificate 憑證


20. 輸入憑證金鑰密碼,該密碼你一定要紀錄下來,否則之後就算申請到也沒用!


21. 將網頁上的加密金鑰檔 (純文字),開啟記事本將內容貼入,並另存新檔


注意:檔案的儲存編碼一定要是 ANSI 格式,若儲存成 UTF-8 with BOM 後續步驟將會發生問題!


22. 準備新增一個域名,選擇你剛剛驗證過的域名,然後按下 Continue 繼續


23. 輸入一個 子網域 (sub-domain) 的名稱


24. 重新檢視你的憑證資訊,之後產生的憑證,單一憑證上將會同時有 miniasp.com 與其子網域兩個域名的 SSL 憑證,最後按下 Continue 繼續。


25. 成功產生憑證,請先另存文字檔,可以用網頁上的建議取名為 ssl.crt 或取名 *.crt 都可以。
注意:這是個不含「金鑰」的憑證而已,不含任何要保護的成分,是可以公開的,這也就是所謂的公鑰


26. 憑證建立成功,你會在網頁右下角看到申請成功的憑證域名


27. 接著準備進入 Tool Box 頁籤,產生 PFX 完整憑證檔(就是包含私密金鑰的重要檔案)


點選 Create PKCS#12 (PFX) File 連結


28. 請重新檢視一下你目前已經產生的資訊有以下三個:

  1. 產生金鑰前設定的「金鑰密碼」 ( 0-Password.txt )
  2. 加密過的私密金鑰檔案 ( ssk.key )
  3. 公開的憑證檔案 ( ssl.crt )


29. 將檔案內容分別貼入網頁上的欄位,如下圖示:


30. 最後點選 Get PFX 下載 PFX 憑證檔


如下圖示,副檔名為 *.p12*.pfx 都是合法的副檔名


免費憑證申請就大功告成!


最後,我們先將 *.p12 檔案匯入 IIS 網站伺服器 (或其他網站伺服器)


再去修正站台的「繫結」設定,將 SSL 憑證選上去即可!